Friday, April 29, 2011

The Great Outdoors

If you need papers for documenting the great outdoors look no further than American Crafts Campy Trails! The LCOM store has a little bit left so make sure to grab some while you can :)


Have a happy day,

Thursday, April 28, 2011

Some More Ad-Libbing

Hi Everyone,
I'm back with a fun mini-album using Bo Bunny's FABULOUS Ad Lib Line! A couple of months ago, my daughter was given an assignment in her art class to design a flag for Youth Art Month, which is a nationally recognized program here in the U.S. Much to our surprise, her flag design was chosen to represent the State of Massachusetts! We were so excited! It was a whirlwind of ceremonies, letters of congratulations all culminating in a trip to Washington, DC for the flag raising ceremony with the other state winners. She was also invited to meet with a Congressman and a Senator from Massachusetts! It was such an exciting time that I had to capture it all in a mini album, and the Ad Lib colors and embellishments were a perfect background!

I started out with a 6x12 canvas album from Prima's Donna Downey Line. I painted the canvas pages of the album and added the ribbon trim to coordinate with the Ad Lib Papers. I also scanned her flag design to make it part of the cover.

I decided to keep the pictures black and white since the papers were so colorful. I used the clear inserts of the album to hold newspaper articles and envelopes I made to hold all of the letters, invitations and ceremony booklets.

She even made the local newspaper!


There were so many keepsakes, I decided to make envelopes to hold them all!


Does anyone recognize that flower embellishment??


This envelope holds the congratulatory letters she received from state and town officials.


It really was an experience to remember! I've listed my supplies below. Make sure to check out LCOM for all of the wonderful Ad Lib goodies soon!

Supplies Used:
Ad Lib Collection Pack
Ad Lib Buttons
Prima Donna Downy Canvas Album
Chipboard, Rub-ons, Dimensional Stickers and ribbon: Bo Bunny Ad Lib
Cardstock: Bo Bunny Double Dot: Mint, Sunflower, Ocean; Double Dot Ledger: wild berry
Stamps: SU Spunky Alpha Stamps, MFT Typewriter alpha
Banner Die: MFT Fishtail Banner
Twine: Karen Foster
Paint: Adirondack Dabbers in Lemonade, Pool, Aqua; Jenni Bowlin for Ranger in stick candy and cough syrup.
Brads: SU

Wednesday, April 27, 2011

Angelic

Angelic by
Zoe Nemburt


Supplies used;
Papers - Bo Bunny Collection Pack, Gabrielle Cameo, Gabrielle Fairest, Gabrielle Stripe, Gabrielle Unwritten, Gabrielle Cut Outs.
Embellishments - Gabrielle 12 x 12 ChipboardPrima Dechire Collection - Ariel, Prima Sugar Blooms, Prima Fabric Leaves, Garbielle Letter Stickers, Pink Paislee Ribbon, Maya Road Vintage Black Pearl Trinket Pins

**********************************************************************************

Hello Scrappy friends, Zoe here again today with my third and final project for April using the Gabrielle collection by Bo Bunny, I absolutely cannot believe it's almost MAY!!! YAYY
So I have been seeing lots of layouts with grids, tiles not exactly sure how you would describe it, I love this technique and it does take a little extra time to cut all your papers to the exact same measurements but the final results are always worth it.
I mainly used papers from my scrap pile and cut rectangles, then I shadowed them with white bazzill there is about 1/4 inch difference in size, distressed all the edges and inked them with some wonderful Tim holtz ink, then set them in a random fashion to get my background, if you have a cutting mat with measurement lines on it these work wonders to help you line then up evenly.
After printing my photo I thought maybe I could have gone a little smaller so you would see more of the tiles behind the photo but I went ahead with it as this is probably one of most favourite pictures I have taken of Yasmin and she has grown so much since then so I kept the size.

I hope I have inspired you to try some grids and tile backgrounds, hop over to the store and get stocked up :)

Happy Scrapping. xx

Monday, April 25, 2011

Sisters

Sisters by Brittney Aldous

Here's my last post using Cosmo Cricket's UpCycle. I've had such a blast with this collection, and I know I'll be digging back into these goodies soon!

For this layout I wanted to use the scraps that were left over from my other two layouts. Since upcycling is the process of converting waste materials into something useful, I found this very fitting!


Supplies

Papers
Cosmo Cricket / UpCycle - Borders
Cosmo Cricket / UpCycle - Redesign
Cosmo Cricket / UpCycle - Elements
Cosmo Cricket / UpCycle - Revolve
Cosmo Cricket / UpCycle - Remake


Other
Cosmo Cricket / UpCycle - Stickers
Cosmo Cricket / UpCycle - Bling Bling
Cosmo Cricket / UpCycle - Buttons
American Crafts Thickers
Maya Road Trinket pins
Bakers Twine

Sunday, April 24, 2011

Ladies Night

Ladies Night by Brittney Aldous

It's time for another layout using the uber fabulous UpCycle! Seriously, if you're looking for a collection that is bold, girly and a bit retro, you need to get your hands on this! One thing that I absolutely love about this collection are the matching embellishments. The butterflies & doilies, as well as the package of buttons make it super easy to add that little extra to your page - no need for digging through jars of buttons and getting those punches out! Everything just works so perfectly!

I did a bit of misting on this page, which warped my paper a bit, so don't mind the lumps and bumps (I'm still trying to flatten it out, LOL).


(Click photo to enlarge)


Supplies

Papers
Cosmo Cricket / UpCycle - Borders
Cosmo Cricket / UpCycle - Redesign
Cosmo Cricket / UpCycle - Repeat
Cosmo Cricket / UpCycle - Revolve
Cosmo Cricket / UpCycle - Remake


Other
Cosmo Crickt's UpCycle
Cosmo Cricket / UpCycle - Stickers
Cosmo Cricket / UpCycle - Bling Bling
Cosmo Cricket / UpCycle - Butterflies & Doilies
Cosmo Cricket / UpCycle - Buttons
American Crafts Thickers
My Little Shoebox letter stickers
Bakers Twine

Friday, April 22, 2011

Cards

Cards
by Nicole Nowosad

***************************************************************************

I made a promise to myself this year to make more cards from scraps from my layouts - so I just couldn't resist using some of my Blossom Soup scraps to make some simple cards!

Both the diecut shapes sheet and the cardstock sticker sheets have the cutest phrases on them that are just perfect to be used on cards for a friend. I added in a little bit of white cardstock and some punches to make a doily shape for the first card and the bottom edge of the second card.

The sunny and fresh colours in this collection are perfect for feel good cards to send to a friend :)
Why not get some Blossom Soup and share one with a friend of yours :)

Thursday, April 21, 2011

Universal Adventure

Universal Adventure by Brittney Aldous

When I received this collection from the LCOM Store, I knew that it would be perfect for our recent trip to Universal Studios, Hollywood. I love the color combination that UpCycle has - it has to be one of my favorites! Absolutely perfect for all of the fun and colorful photos that we took!


I just love the look of baker's twine on my pages, but I wanted to try something different with it. I took the wood veneer hearts by Studio Calico, and wrapped the twine around the heart. I love how it turned out, and it'd work with any of the shapes that Studio Calico came out with!

Supplies


Papers
Cosmo Cricket / UpCycle - Borders
Cosmo Cricket / UpCycle - Redesign
Cosmo Cricket / UpCycle - Repeat
Cosmo Cricket / UpCycle - Reverse


Other
Cosmo Crickt's UpCycle
Cosmo Cricket / UpCycle - Stickers
Cosmo Cricket / UpCycle - Bling Bling
Cosmo Cricket / UpCycle - Butterflies & Doilies
Studio Calico / Wood Veneer - Hearts
Maya Road / Resin Blossom - Brown
American Crafts Thickers
My Little Shoebox letter stickers Bakers Twine

Wednesday, April 20, 2011

Mini Albums

A few new projects will be added to our store tomorrow morning!

Both are really adorable and I am quite pleased with the results.
If you are interested in mini albums then take a peek ---

A Boy's Life
was created with Crate Paper - Toy Box,
Measures 6x6 and Totally Cute!

Pretty Little Sweetie

was also created using Crate Paper - Emma's Shoppe
it Measures 5x7 and so girlie .. I love it!

I will also have on the site a preorder option if you are interested in next month's kit
NO Membership Required! ( I'll be using Jillibean Soup - Dutch Mustard Soup )

- i have no official release date for the mini albums since i dislike working with deadlines...
so as i finish them i'll post them on my personal blog and here at LCOM to let you know they are being released for sale.

They are priced quite reasonable and often times you'll have extra supplies to create more pages or a layout ;-)

Thanks for dropping by!!

Happy Wishes!

The fun spring colours of the American Crafts Campy Trails line make for a perfect birthday card! Check out the LCOM shop to get yours!


The Elle's Studio Birthday Pennants make a perfect addition to your cards...


Have a happy day,

Tuesday, April 19, 2011

Glubers!

Hi Everyone, I'm back with a quick post to introduce one of the most fun new products out there... Glubers!! Ok, so if you're thinking what in the world is a Gluber, think Uber Glue Dot!! Glubers are GIANT glue dots from Cosmo Cricket and they're available in a variety of sizes from 2" to 3" wide. Now you might be asking yourself, what would I do with a giant glue dot... you'd make flowers! It's really easy! If you go to Cosmo Cricket's blog, they have a variety of tutorials on how to make different kinds of flowers, but I thought I'd show you one of the easiest ways. All you need is a Gluber, a 1"x 12" strip of fabric or ribbon and a center.. which could be chipboard, a button, bling.. you name it! For this project, I used Bo Bunny's new Ad Lib Trims and Chipboard.

To start, just peel off one side of the backing to the Gluber. (Try not to touch the uncovered Gluber, you'll find yourself fighting to unstick your fingers!) Start the strip of fabric, good side up about 1/2" from the outer edge of the Gluber. Press the fabric strip around the edge of the Gluber, finger pleating as you go.
Go all the way around the Gluber, and when you get back to the beginning, trim any remaining fabric.
To complete your flower, press the center item into the middle and voila, you have a custom flower for your project. To attach to your page (or album, or headband, or... you name it!) peel the remaining film from the back of the Gluber and stick!
Isn't that fun?! Just think of the things you could make! To get your Glubers now, stop by the LCOM store! I'll be back next week with a fun mini-album with some more Bo Bunny Ad Lib... don't be surprised if this flower makes an appearance!
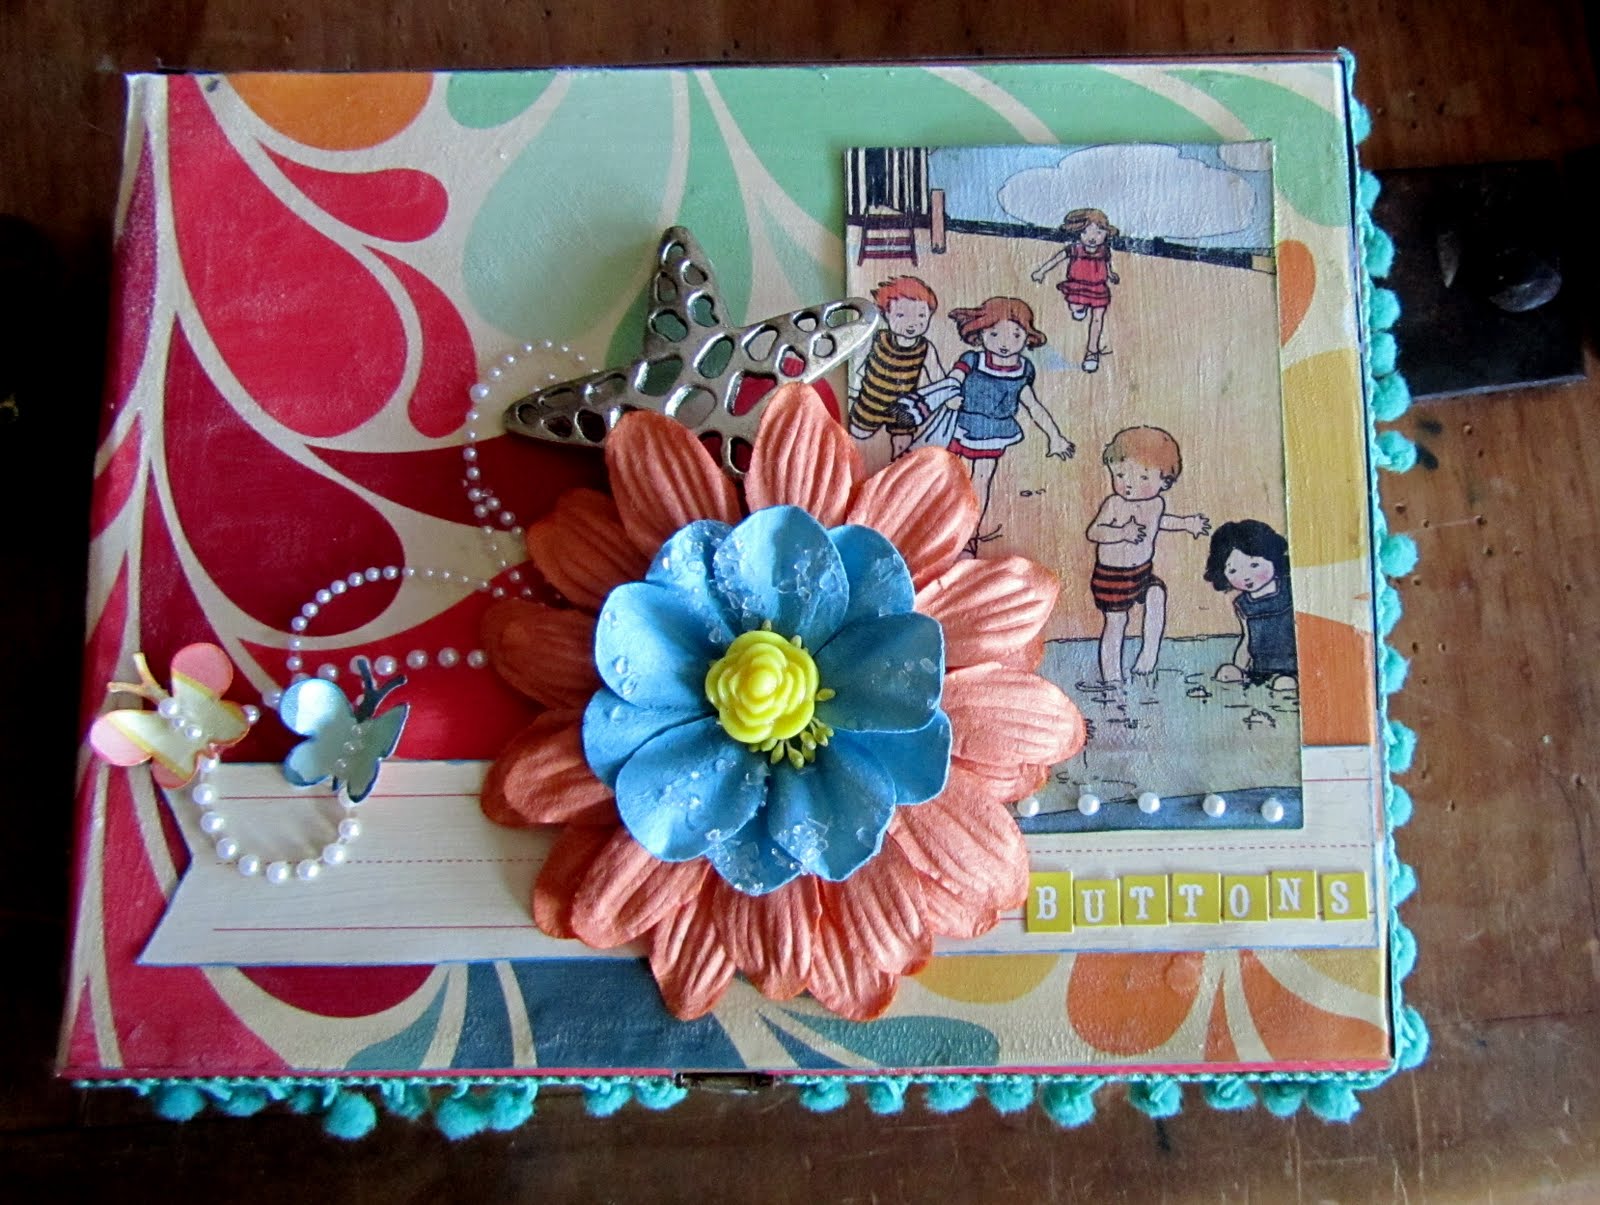

Kathy

Monday, April 18, 2011

More Cosmo Cricket Fun!

Beachy Button Box
by Krissy Clark McKee


Supplies Used
Cosmo Cricket Salt Air Collection
Decoupage Glue
Acrylic Gel Medium
Paintbrush
Clear Crackle Paint
Cosmo Cricket Tiny Type Letters
Small Butterfly Punch
Pearl Flourish
Three Flowers - different sizes
One Charm
Pom Pom Ribbon

I have been having so much fun playing with the Cosmo Cricket Salt Air Collection! One of the reasons I love it is because it is extremely versatile! Not only can you use this collection to scrap your vacation pictures from last summer, but the Salt Air papers are perfect for your vintage-themed projects, such as this button box I made by recycling a discarded cigar box. Would you like to make one? Here's how:

First, I used an old beat-up cigar box that Hubby was going to throw away.

I started with the sides of the cigar box, measuring out the strips of paper for each section and gluing them on with liberal amounts of decoupage glue, which can be purchased at any craft store. I used a small craft knife to cut around the clasp in the front and the hinges in the back of the box.

Next, I adhered the paper to the top and bottom of the box. After I completely covered the outside of the box I coated the entire surface using an acrylic gel medium. I simply brushed it on with a paintbrush. After this dried thoroughly, I painted over the entire outside surface using a clear crackle paint.


Once the outside was completed, it was time to cover the inside of the box. All of the Cosmo Cricket Salt Air Collection papers coordinate so beautifully together that it was hard to choose which papers I wanted to use! I loved mixing and matching the bright, vibrant patterns! Since my box is going to be used to hold buttons, I decided to make an interior pocket to hold extra needles (that I always seem to misplace). I simply glued down three sides of a cut out piece of paper, originally a journaling tag included with the Salt Air Collection, to the inside top of my box.


Finally, I was ready for the fun part - decorating my altered box! I simply cut out parts of the Borders Page and the Elements Page from the Salt Air Collection and painted them with crackle paint so as to maintain my vintage feel. I used a butterfly punch, a couple of flowers that I layered together, a starfish charm, and a pearl flourish to complete the top. For a finishing touch, I adhered pom-pom ribbon around the sides of my box.


My Beachy Button Box was super fun and not difficult to make at all! And the STORE is getting more and more embellishments and papers in every day, so why don't you head on over and pick out the perfect supplies you need to make your own altered item?!

Sunday, April 17, 2011

Wonderful

I just finished a layout that I made for my 8 X 8 album and wanted to share...


The Campy Trails line from American Crafts is so perfect for outdoor layouts...even little memories like the baby robin that we watched grow up! Be sure to check out the Campy Trails line at LCOM!

Other supplies used from LCOM...

Maya Road wood button

Maya Road crystal star 
  
Best Creations / Adhesive - Foam / Small Squares

• these little foam squares are my new favorites...
best of all they are only $1.50/pack!


Have a wonderful Sunday,