Showing posts with label Mini Albums. Show all posts

Wednesday, September 26, 2012

Simple Stories Awesome Mini Album

If you've got boys, you know how hard it is sometimes to find a versatile collection for photos of them, even harder if you need to tackle a multi themed travel album. I must say, I really enjoyed this collection by Simple Stories; it's full of colour, but in a "big boy" kind of palette. It's cool enough for older boys, but not over the top, so it was perfect for a mini album featuring my 3 little guys. I also loved working with this album by Basically Bare. I loved the varied shapes and textures of the pages, and that I was able to customize the page order.


 A little alcohol ink and some collection stickers, made layering this acrylic page fun.

I love the texture left on the corrugated pages once you peel off the top layer a bit.

Another great feature of the album were these acrylic tags. I stamped a map texture on them using Staz On ink in Timber Brown.

Some of the 4x6 sentiments were a perfect fit  for my photos.


There you have it an entire road trip in one compact little album!
Made easy with the Awesome collection by Simple Stories, and a Rowdy Rooster Album by Basically Bare.

Erin Morehouse


Monday, September 24, 2012

Basically Bare Mini

Today it's my turn to share with you the mini I created this month.  I used the Basically Bare Polly Pocket Album & Echo Park Happy Days Collection.

I knew right away that I wanted to do a mini album of our Summer.  So, I printed off my photos and off I went.  I love the look of the 'naked' album.  I find it super easy to work with.  Where some may feel the need to cover the entire thing up with patterned paper, I actually like the look of the chipboard under my photos.  Here's my cover.  I used an old Pink Paislee Mask and some white Mr.Huey's, to create a little bit of pizazz to it.  I felt the cover needed just a little something more without adding a bunch of patterned paper.
Rather than go into detail about every page, I'll simply let them speak for themselves.  If you saw my Amy Tangerine mini, you'll remember that I love to add bits and pieces to my albums, mixing and matching different manufactures.  I used the Echo Park Happy Days collection as my base, and added just a few little bits from my stash.  For the most part all my embellishments are made of paper and/or stickers from the collection.
I combined a few photos using a brad for easy viewing
under the "flip" sticker
The album comes with five chipboard inserts for the pockets.  It quickly became apparent, however that I needed a little more for this project.  No problem.  The pockets were wide enough to simply make a few more inserts out of scrap pieces of cardboard (from cereal boxes, etc) and simply add them in.  Here is an example of just that.  Both these pages fit in the same "Aug Long" pocket.
Front view
Rear view of same inserts
Here is another set of two.
Front view
Rear view of  same insert
Even after adding a few more inserts, I still had a handful of photos that I wanted to include in the album.  Solution: tape an envelope to the back page to hold  said photos.  Easy peasy.
You can see that even though I've added those extra pages, and the envelope, that the album is not terribly thick.  Still thin enough to be easily stored on my shelf with the others.

The beauty of these little albums is how quickly they make creating a fun little keepsake.  This album from start to finish took me about 3 hours.  Sometimes I can spend that on one layout, so that gives you some perspective.

The entire Echo Park - Happy Days collection and several different varieties of Basically Bare mini albums are all currently available in the shop.

Hope you've been enjoying our Mini Album Month!  There is so much new product arriving in the store these days, it's not hard to get inspired to create.

Happy creating friends!

Wednesday, September 12, 2012

Smash Book

Hi Everyone! It's Kate Vickers here today sharing part of my Smash book. It's still a work in progress, but I have quite a bit of it done to show you (more on Friday).

As you can see, I altered the cover. I found it a bit 'blah' and I wanted to hide the Smash logo. I coloured the kraft part of the book with a Faber Castell Gelato and then sprayed it with water to blend it in. This made the debossing on the cover stand out a lot more. I did the machine stitching on the Crate Paper Pretty Party chipboard pieces and the border stickers to make them look as though they are stitched right onto to the cover.

Smash Book Altered Cover

Here's a close up of the 'About Me' title on the cover.

DSC_4162

These are the first two pages. These two pages are about my last horse. I don't own him anymore and I really miss him, so these pictures are very special to me. We are at a horse show here and my (new at the time) husband was helping me a lot at shows. He was there to hold my horse when I needed an extra pair of hands and to calm my nerves (I'm a bit of a nervous wreck at horse shows). I used Crate Paper's Pretty Party for most of the book, with a few odds n' ends added here and there.

Smash Book page 2-3

Here's a close up. I hid some of the journalling in a small kraft paper bag. The heart is cut out of a piece of raw canvas and coloured with Dylusions ink. I used pink Jillibean Soup Alphabeans stickers for the letters.

DSC_4167

These two pages are of my first horse. I have lots of fond memories of him. He was a sweet horse and he loved to do his job. He was a good jumper and loved to show off at shows. On these two pages I used more Crate Paper Pretty Party and I also used some Jillibean Soup Neopolitan Bean Bisque, a Maya Road kraft doily, a Jenny Bowlin stamp and some other random embellishments.

Smash Book page 3-4

In this close up shot, you can see the Jenny Bowlin stamp that I used for the horse show ribbon. This stamp is so fun on horse-related and kid-related projects. I love using it.

DSC_4174

That's all that I have got for today. I hope that you will drop by again on Friday. I have more to share with you then! Thanks for looking! :)

Monday, August 27, 2012

Amy Tangerine Day Book

The Amy Tangerine Day books have been hot sellers since the moment they arrived on the scene.  Although I really liked the look of them I was hesitant as to whether or not I would enjoy working with them, as the pages are a much lighter weight than I was accustomed to.  Needless to say as soon as I began filling the first page all hesitations were washed away.  The album was incredibly easy to work with.

I decided to use it to do a 'Book Of Me'.  Here's the finished album.  
I apologize in advance for my hand being visible in many of the photos.  Photographing this little guy proved a lot more tricky than putting it together :)

Click on the images to enlarge
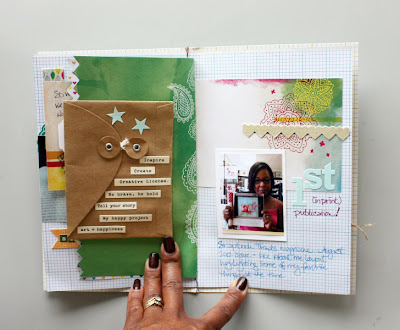
the envelope houses the acceptance email from Scrapbook Trends
The game day ticket is peeking out behind the page

I've mentioned before how important I think it is to scrap about ourselves in addition to our family and friends.  This little book will serve as a reminder in years to come of all the rich blessing my life held at this point.  It may seem to go against the grain to do a BOM album in the middle of the year, but that's me, that's how I roll, and I find great freedom in scrapping whatever my heart desires, and not restraining myself to chronological order, or standard timelines.

If you struggle with mini albums and don't know where to start here are some ideas that may help you to get started on your own: 

1. Select a theme for your album.  Choose something that you have at least a handful of photos for.

2. Print your photos.  I suggest you stick with photos that are 3x5 and smaller.  I find it difficult to work with 4x6 photos in a mini album.  As a rule, the more embellishments you wish to use the smaller your photos should be.

3. Start with the products you love, elements that will co-ordinate with the album you've selected.  Don't limit yourself to only what you think you 'should' use, and grab more than you think you need.  Gather it all, the assortment of goodies will inspire you.

Here's a peek at some of the product I started with.
As you can see not all of it got used, but it sure got my creative juices flowing, just seeing it all in one place like that.
4. Start cutting and pasting.

5. Enjoy the process.

At least these are the things that work for me. 

I used a lot of miscellaneous bits and pieces from my own stash for this album.  All the Amy Tangerine products, however are available in the store.  So are the Maya Road canvas butterflies.  Here are the links for easy shopping.  While you're there, I'm sure you'll see some other fabulous goodies, perfect for your next mini.


If you are inspired to create a mini, please let me know.  I'd love to come and have a peek.