Showing posts with label Altered Item. Show all posts

Thursday, December 31, 2015

Product Shuffle - Napkins

Happy last day of 2015!

Preparing for our New Year's Eve party at our home tonight, the girls asked for a Pinata. We found one on clearance for 2$ at a local store.  Here is it.
It was kind of cute, but more fitting for a birthday party than a New Year's Eve party.  So we headed to my craft room and set out to alter this pinata.
I made the numbers with my cricut using foiled cardstock from Fancy Pants Design.  I then cut a large circle in a 12X12 pattern paper I had in my stash.  Since the Pinata was about 20 inches in diameter, the 12 inch circle did not cover all the dinosaurs.  I then added glue to the back edge of my circle and added 4 ruffled napkins.  I folded the napkins accordian style and simply pressed them in the glue. Here is the finished product.
The kids are eager for the countdown and make the candies fall from our new beautifull pinata.

I hope you all have a wonderfull evening and I wish you all the best for 2016!  See you all next year!

Thursday, February 20, 2014

Product Shuffle: Altered Journal Tags!

Hey guys!! Today I've got my altered journal tag project to share for our product shuffle. I got the Elle's Studio You and Me note tags and large journaling tags. These little tags are the cutest things ever! Love them.

So I had a few projects in mind for these babies. First, I don't do project life or pocket style scrapbooking but I knew these would be so cute for that kind of thing (if you're into that kind of thing). BUT I do sometimes use these little journal cards and tags on my regular scrapbook pages. So that was another idea. Lastly, I thought about making a little mini album with some journaling on the back and maybe a couple of photos. Since these all seemed like such excellent ideas, I never got around to completing ANY of them because I'm kind of waiting to be inspired by one of the projects specifically. So we'll see what happens there.

At any rate, I did alter the tags and I think they're really cute. Here are four that I designed:
You could use literally ANYTHING from your stash to alter your cards. I used stamps, wood veneers, die cuts, washi tape, and candy dots.

If you were into pocket style scrapbooking, here's an idea of how they could work for that:
I'd love to see your ideas and how you alter your own journal tags and cards. Please upload them to the LCOM gallery! Hope you enjoyed today's Product Shuffle and I'll see you soon!

Saturday, October 27, 2012

Tanya's Surprise Box Part II

Remember my surprise box from Tanya this month?
One of the items in the box was a Simple Stories 12x12 memorabilia pocket (pictured bottom left box, top left corner).  I was wracking my mind trying to come up with an unconventional way to use this outside of my scrapbook.

In our home we have a lot of papers/notes that need a home from time to time.  For example permission slips, or fund raising forms the girls bring home from school.  There are also checks that need to be deposited, and letters/cards to be placed in the mail.  Because my fridge is stainless steel, I can no longer use magnets to simply tack things onto the front of the fridge.  We found a solution in the form of our garage access door.  It's not pretty but it works as far as tacking papers that need to be returned/mailed/signed/deposited, etc to it with magnets.  It works, but drives me crazy to look at.

Enter Simple Stories memorabilia pocket, ribbon, pins, and stickers.  I used more of my mystery box items to create this...
A cute little pocket to hold all the 'stuff'.  I simply use magnets to hold it to the door and voila, no more eye sore of a door every time I leave the house.  Cute and functional.

Friday, July 20, 2012

Scrappin' Your Stash

The excitement of CHA can be felt all over the scrappy web.  It's always so exciting to see what our favorite manufacturers have come up with to delight our scrappy senses.  I know I'm not the only one who struggles with balancing wanting more new goodness and using up the goodness we still have in our stash.  As much as we want to bring brand new scrappy goodness into our home, we have a slight sense of guilt over all the scrappy supplies we still have piled up, staring us in the face ever time we sit down to scrap.  For today's post, I thought it may be a good idea to showcase a couple of ideas to help us use up some of that stash to make room for some of the new CHA goodness we've got our eye on.  So I gathered up my Crate Paper Pretty Party Collection pack, and some other random supplies that have been gathering dust in my space and got to work.
First an altered tin.  Add a little Mod Podge, eliminate a few things here and there, and voila a cute little tin for my 10 year old girly, girl to keep her treasures in.

Next up a layout.
This design uses 10 different strips of paper.  It's not a new design by any means but efficient in helping you to make a dent in that stash of yours.  Have a look and you'll see what I mean.
To create this design I began by using a lightweight piece of cardboard I recycled from my pocket page protector packaging.

I cut the piece of cardboard to 12" x 6.75".  I then marked the center point on the cardboard and drew angular lines about every two inches all the way around.
Next I sliced the pieces apart, and numbered them so that I could replicate it easily once the pieces of patterned paper were cut out.  This will also allow you to keep, and reuse the pieces over, and over again.
Because the traced pieces are always slightly larger than the original there will be a tiny bit of overlapping at the center.  This is easily covered up once you put your layout together.  I like the look of stitching on my pages, and this is a great design for it.
Remember we're trying to use up our stash, so I've layered several die cut shapes,  and boarder stickers that came with the collection around my photos.

And here is the final product.
 
The photos are from Tuesday when two of my longest standing friends came over for the afternoon. It had been a long time since we'd all been together. Hover your mouse over the photo to read the journaling.
I hope I've been able to inspire you to dig into your stash and put some of the scrappy goodness you've been hoarding, or just haven't gotten around to using, to good use.  What kinds of empty little containers have you been saving that could benefit from a little sprucing up with pretty paper, ribbon, and embellishments?  Canning jars?  Pringle tubes?  Little vases from the Dollarstore?  I'm sure you don't have to look too hard to find something.  And what about all those layouts you've been pinning, or adding to your 'favorites' folder that use a lot of little bits of paper and tags, or die cuts, or journal spots?  Maybe it's time to lift one and make some room in your stash for the new goodness that's sure to arrive in the store witin the next month or two.  If you do decide to tackle your stash we'd sure love to come and have a peek, be sure to link us up.

Happy scrapping!

Scrappy Goodness Used:
Crate Paper Pretty Party
Maya Road Vintage Butterflies
Maya Road Pins
Maya Road ribbon
Ormolu Chevron Tag
October Afternoon Sticky Keys
American Crafts Thickers
The Twinery Twine
3D Foam Squares
Other:
Petallo flower
May Arts Jute & Tulle

Tombow Adhesive


Monday, April 30, 2012

FABulous framed

This vellum paper from the Dear Lizzy Neapolitan line had caught my eye when it was first released.
I had no idea what I was going to do with it, I just knew I liked it.  The sticker sheets that came with the the Simple Stories Fabulous line were also screaming to be used for something other that scrapping. 
Then it happened. I came across a sweet little white frame by Fancy Pants (on clearance, I might add) I knew exactly what I would be using all these items for. I combined a few bits and pieces and came up with an altered frame to hang in my daughter's room.  I began by adhering the vellum sheet to the back of the frame.  Everything else is stuck onto the front of the frame giving it some dimension. 
The sun was created by sticking down strips of double sided tape and then layering strips of the trim down beginning at the bottom and working my way up, layering it as I went.
The kite is hand cut, stitched together, by machine, and coated with glossy accents adding some sheen and pop.  The twine is stuck down by painstakingly applying teeny tiny dots of Glossy Accents one dab at a time and holding the twine in place with tweezers for a minute or two.  Once the twine tried I went back over the same spots and adding a little more Glossy Accents, and topping with bits of tulle that I first tied into tiny little bows.
This was my first time tackling a project like this.  I really enjoy looking at altered work created by others, being somewhat of a perfectionist, I'm afraid to ever give anything a go myself.  I always have a fear of wrecking it, wasting product, and not seeing my idea come to life.  This is what I created.
This turned out pretty well (if I do say so myself).  Although the kite flying weather has not yet arrived on the prairies, catching a glimpse of this little project makes me smile in anticipation of warmer days, sunny skies, and family outings to the park.

Have you created an altered item lately?  If so leave us a link in the comments.  I, for one, would love to come by hand have a peek.  I'll even leave you a little love.  Also don't forget about the Design Team Call.  You still have time to get your application in, so please don't be shy.  You can get all the details here.  Good luck, and have a wonderful Monday!

Products used & available in the LCOM store:
Maya Road: Trim
Bazzill Basics: Tulle
Ranger: Glossy Accents
The Twinery: lemondrop
Other:
Fancy Pants frame
Sookwang tape
Dear Lizzy Silver Lining Vellum

Monday, April 18, 2011

More Cosmo Cricket Fun!

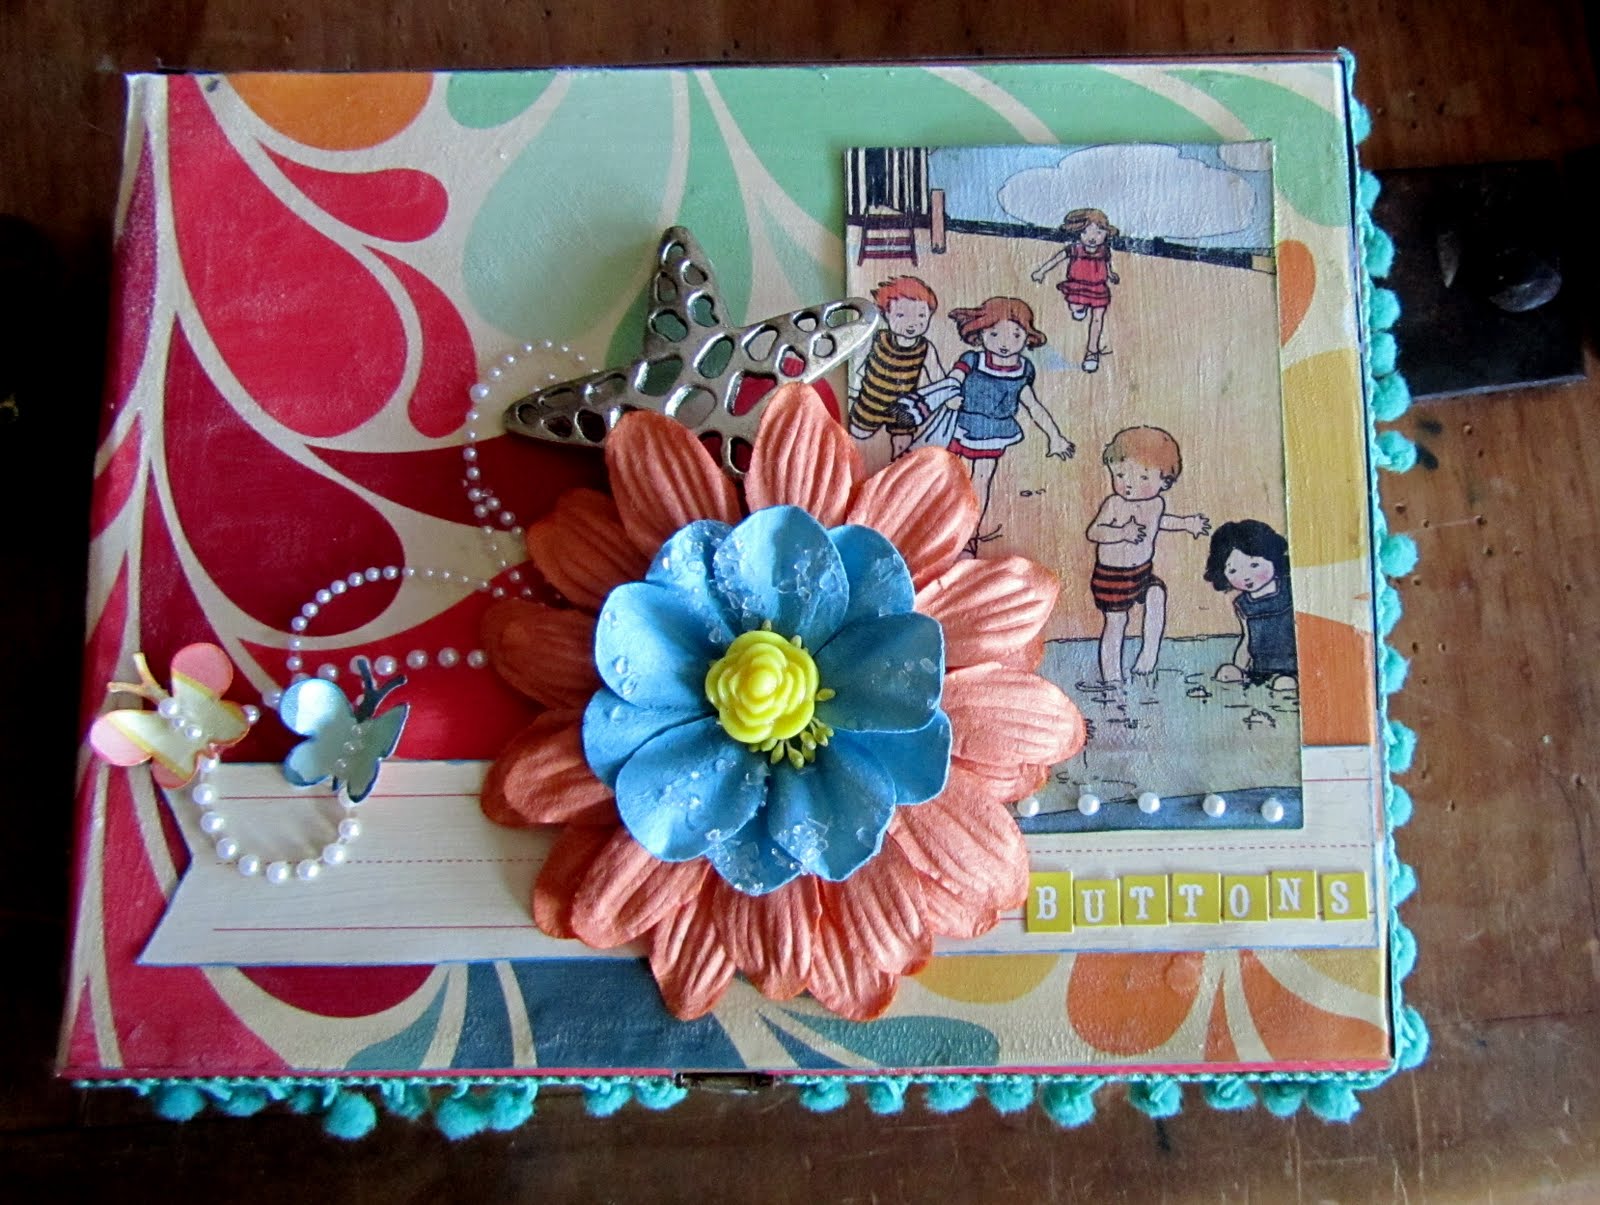
Beachy Button Box
by Krissy Clark McKee


Supplies Used
Cosmo Cricket Salt Air Collection
Decoupage Glue
Acrylic Gel Medium
Paintbrush
Clear Crackle Paint
Cosmo Cricket Tiny Type Letters
Small Butterfly Punch
Pearl Flourish
Three Flowers - different sizes
One Charm
Pom Pom Ribbon

I have been having so much fun playing with the Cosmo Cricket Salt Air Collection! One of the reasons I love it is because it is extremely versatile! Not only can you use this collection to scrap your vacation pictures from last summer, but the Salt Air papers are perfect for your vintage-themed projects, such as this button box I made by recycling a discarded cigar box. Would you like to make one? Here's how:

First, I used an old beat-up cigar box that Hubby was going to throw away.

I started with the sides of the cigar box, measuring out the strips of paper for each section and gluing them on with liberal amounts of decoupage glue, which can be purchased at any craft store. I used a small craft knife to cut around the clasp in the front and the hinges in the back of the box.

Next, I adhered the paper to the top and bottom of the box. After I completely covered the outside of the box I coated the entire surface using an acrylic gel medium. I simply brushed it on with a paintbrush. After this dried thoroughly, I painted over the entire outside surface using a clear crackle paint.


Once the outside was completed, it was time to cover the inside of the box. All of the Cosmo Cricket Salt Air Collection papers coordinate so beautifully together that it was hard to choose which papers I wanted to use! I loved mixing and matching the bright, vibrant patterns! Since my box is going to be used to hold buttons, I decided to make an interior pocket to hold extra needles (that I always seem to misplace). I simply glued down three sides of a cut out piece of paper, originally a journaling tag included with the Salt Air Collection, to the inside top of my box.


Finally, I was ready for the fun part - decorating my altered box! I simply cut out parts of the Borders Page and the Elements Page from the Salt Air Collection and painted them with crackle paint so as to maintain my vintage feel. I used a butterfly punch, a couple of flowers that I layered together, a starfish charm, and a pearl flourish to complete the top. For a finishing touch, I adhered pom-pom ribbon around the sides of my box.


My Beachy Button Box was super fun and not difficult to make at all! And the STORE is getting more and more embellishments and papers in every day, so why don't you head on over and pick out the perfect supplies you need to make your own altered item?!