Showing posts with label Kathy Skou. Show all posts

Friday, October 28, 2011

Lucky to be Friends

Hi Everyone... I'm back with my last post using Bo Bunny's Garden Girl Line. I love this picture of my daughter and friends. One of my friends had a tea party at the end of last summer and all of the girls, big and little, in the neighborhood came to have fun! It was too cute.

I added some of the rub-ons from the Garden Girl collection and I colored the Petaloo Crocheted flowers with some Glimmer Mists.
I cut the title piece from the Cut-outs paper in the collection pack.. it was a perfect fit!

Since this is my last post as part of the MT, I just want to say that I've really enjoyed being part of the LCOM Marketing team and I really would like to thank Tanya and Kristine for having me. I've met many lovely and kind ladies here and plan on sticking around to be inspired by the new MT!


Products Used:
Bo Bunny Garden Girl Collection Pack
Bo Bunny Garden Girl Buttons
Bo Bunny Garden Girl Rub-Ons
Bo Bunny Double Dot Cardstock: Chiffon
Petaloo Devon Crocheted Flowers
Glimmer Mist: Harvest Orange, Red Velvet, Sugar Plum Fairy

Thursday, October 20, 2011

Bo Bunny Garden Girl Canvas

Quite a few of my friends have been bitten by the She-Art bug. I adore these fun canvases, but swore I would not pick up another crafty hobby. Well, as they say, never say never..... My friend was teaching a canvas class recently and I love her work, so I signed up. It is SO MUCH FUN! I decided that the Bo Bunny Garden Girl Line would be perfect for a canvas. Here's my twist on the She-Art Movement... maybe we should call it Meow Art???


I cut the butterfly directly from the Garden Girl paper.


I love the colors in this line and thought they were perfect for a bright flower garden. Some of my flowers were pieced using the different patterns, others were cut directly from the designs on the papers.

I'll be back at the end of the month with one more project using Garden Girl.


Products Used:
Bo Bunny Garden Girl Collection
Bo Bunny Double Dot Chiffon
Claudine Hellmuth Studio Paints Contemporary and Metropolitan
Stamps: Stampin'up

Monday, October 3, 2011

Seems Like Just Yesterday

October 3rd is a special day for me... it's my anniversary! Happy 19th Anniversary to my wonderful husband, Ed. I thought it would be perfect to scrap a picture from the beginning of "Us". I haven't scrapped our wedding yet (although I do have a bin full of shower, wedding and honeymoon pics!) Someday....
I'm completely in love with Bo Bunny's new Garden Girl Line. The colors remind me of fall, very rich. I die cut the flowers from some of the jewel-toned papers and scattered them along the chipboard vine that is part of the collection.

The butterfly was hand cut from the "Garden Girl" paper.


It was fun to look back.. really doesn't seem that long ago! Make sure to go over to the LCOM Store.. there's tons of new product flowing in...also pick up the Bo Bunny Garden Girl Collection to scrap your fall photos.


Products Used:
From the Bo Bunny Garden Girl Collection Pack- Stripe, Vines, Wisteria, Garden Girl, Dot
Bo Bunny Garden Girl Chipboard Stickers
Jillibean Kraft Mini Alphabet
Thickers Marquise Alpha

Monday, September 19, 2011

Dots & Stripes Calendar

Hi Everyone,
I'm back with my last project using Echo Park's Dots & Stripes line. I decided to mix it up again, and used both the Candy Shoppe and Metropolitan lines for this cute little perpetual calendar.

I got the idea for this while flipping through one of my favorite catalogs. They were selling a fun, colorful perpetual calendar, and I thought... how easy, I can do that and the Dots & Stripes lines were a perfect fit... already color coordinated and bright and cheery!

All I needed to create the free standing calendar was some chipboard, patterned papers, alpha and number stickers and my Bind-it-all (which took a while to find....)


The letters and numbers are from the Metropolitan Alpha Sticker Sheets (it took 2 sheets). This made the project even easier because there was no need to stamp or cut out the words & numbers.


I mixed and matched the patterns and colors for months, days and numbers to make it more fun. I'm thinking this might make a great teacher/coach gift for the holiday season. It really went together quickly. (that is once I reacquainted myself with my bind-it-all....). That's all for now, I'll be back next month with some Bo Bunny Garden Girl. Make sure to come back on Wednesday, to see what Zoe has created!


Supplies Used:

Patterned Papers: Echo Park Dots and Stripes Metropolitan: Leaf Small Dot, Ruby Red Small Dot, Concrete Small Dot, Teal Small Dot; Echo Park Dots & Stripes Candy Shoppe Mango Small Dot, Lemon Drop Small Dot, Bubblegum Small Dot
Stickers: Echo Park Dots & Stripes Metropolitan Card Stock Alphabet Stickers
Zutter Bind-it-All White O-wire 1 1/4"
Grafix Med. Weight Chipboard 12x12

Wednesday, September 14, 2011

Cute as a Button

I can't believe summer vacation is over and we're already back into the routine of school, activities, homework, sleep, repeat! This week officially marks the start of our FULL schedule, and my job title officially changes to taxi driver and schedule coordinator! Luckily I did find time to scrap a little between lunches and laundry! I'm back with some more Echo Park Dots and Stripes. This time I mixed up both the Metropolitan and Candy Shoppe lines. I just love the colors and the simplicity of the patterns!

This is a picture of my daughter with one of our favorite little neighbors at the tea party held for all the girls in the neighborhood last month. It was so cute to see all the girls, big and little, dressed up and having fun together. They ranged in age from 13 down to 18 months! I kept the layout simple to let the picture be the focus.


I used the pennants from the Alpha Stickers Sheets along with some Twinery Twine to create a cute little banner.


I punched a heart from the Bubblegum paper and popped it up over a piece of the reverse side to give the layout a little dimension and show off the different patterns.


And the title was so simple to create... I combined the Alphas from both lines and added a Whimsy to complete it! It really was an easy and fun layout to create! I'll be back next week with my final Echo Park Dots and Stripes project...be sure to check in Friday to see what Nicole has created!


Supplies:
Patterned Papers: Echo Park Dots & Stripes Metropolitan Leaf Small Dot, Teal Small Dot; Echo Park Dots & Stripes Candy Shoppe Mango Small Dot, Bubblegum Small Dot
Stickers & Alphas: Echo Park Dots & Stripes Metropolitan Element Stickers, Alpha Stickers; Echo Park Dots & Stripes Candy Shoppe Alpha Stickers
Card Stock: Bazzill
Twine: The Twinery Blossom Light Pink, Caribbean Teal, Honeydew Chartreuse
Button: My Little Bit of Whimsy

Friday, September 2, 2011

Happiness is...

Hi Everyone... as promised, I'm back with some Echo Park Dots and Stripes Metropolitan! I LOVE the simplicity and colors of this line. I was inspired by some of the other Marketing Team members to think "outside of the page" this month, so I created a frame that my daughter could hang in her room featuring some of her favorite things (and people, and cats....)
The pictures are backed with the Metropolitan papers and are clipped to some Twinery Twine with little clothes pins I had in my stash.
I used some Maya Road Kraft Tags to label the pictures and canvas banner pennants are also from Maya Road and colored using mists.

And of course... there are Whimsies!!! It was a really fun project to put together and my daughter can't wait to hang it in her room! I'll be back later this month with some more projects using Echo Park's Dots and Stripes!


Supplies Used:
Papers: Echo Park Dots and Stripes Metropolitan Large Dot Navy, Concrete Small Dot, Ruby Red Small Dot, Teal Small Dot, Leaf Small Dot
The Twinery: Caribbean Teal, Honeydew Chartreuse, Stone
Maya Road: Kraft Mini Tags, Mini Pennant Banner Canvas
Canvas Corp: Frame memo Board, Clothespins (mini)
Alpha: Bella Blvd. Ciao Chip

Mists: Maya Road Lime Metallic, Shimmerz Spritz Seafoam
Buttons: My Little Bit of Whimsy

Wednesday, August 31, 2011

Sparkle

Hi Everyone,
I can't believe it's actually the end of August! I hope all my friends along the East Coast of the US and Canada survived hurricane Irene safe and sound! We were lucky, never lost power but our town was hit pretty hard... lots of roads closed and school was cancelled! (that never happens) I decided to ride out the storm by scrapping my last project with My Mind's Eye's Hip Hooray Girl Collection. Since my last two layouts were birthday themed, I tried to create a layout with a different theme... I succeeded, almost! This picture is of my daughter at a friend's birthday party. It was on the third of July, so part of the fun was the lighting of sparklers. I just love her face in this picture!


To keep with the "sparkle" theme, I spritzed the background paper with some Tattered Angels Glimmer Mist in Party pink, and I also colored the Jillibean corrugated shapes with some sparkly mists. I added Stickles to the letters to make them sparkle as well!

That's all for now, I'll be back later this week with a fun project using Echo Park's Dots and Stripes collection. Until then, make sure to stop by the LCOM store regularly... all sorts of new goodies coming in!
Supplies Used:
PPs: My Mind's Eye Hip Hooray Girl: Confetti, Jubilant, Make a Wish, Party Time, Happy Day and Accessory sheet
Cardstock: Bazzill Kraft
Jillibean Soup Corrugated Shapes: Butterflies, Hearts
Tattered Angels Glimmer Mist: Party Pink, Chalkboard Peacock
Maya Mist: Metallic Salmon
Alphas: Cosmo Cricket Tiny Type Handwritten; Bella Blvd Making the Team Alpha+Bits
Stickles: Stardust


Wednesday, August 17, 2011

Birthday French Toast

Hi Everyone, I'm back with some more My Mind's Eye Hip Hooray -Girl. This has been such a fun line to work with... the colors are so bright and cheery! They coordinated perfectly with this picture of my daughter enjoying the Cinnamon Swirl French Toast I made for her birthday breakfast last year!
I had fun with clustering embellies again... it's a new favorite thing of mine...I painted some Jillibean corrugated shapes and also created a flower using a Gluber and some Maya Road pleated ribbon. I just fell in love with that owl!


I also spritzed the background paper with some Glimmer Mist for texture. A few buttons and some twine from the Twinery and voila!


I'll be back at the very end of the month with one more project using Hip Hooray. In the meantime, make sure to stop by the store at LCOM... new goodies are coming in every day from CHA!!


Supplies used:
Card stock: Core'dinations Tim Holtz Pool
PPs: My Mind's Eye Hip Hooray-Girl Confetti, Happy Day, Party Time, Accessory Sheet; Scenic Route Graph paper
Chipboard: Jillibean Corrugated Shapes Hearts, Bazzill Chips Garden Flowers
Fibers: Maya Road Pleated Ribbon; The Twinery Blossom Light Pink, Caribbean Teal, Honeydew Chartreuse
Paints: Adirondack Pearl Metallic, Hazelnut, Shell Pink, Citrus; Jenni Bowlin for Ranger Chicken Feed, Malted Milk, Brown Sugar, Cough Syrup
Buttons and Pins: My Little Bit of Whimsy
Tattered Angels Glimmer Mist Turquoise; Maya Mist Lime Metallic
Tiny Type Handwriting
Gluber

Wednesday, August 3, 2011

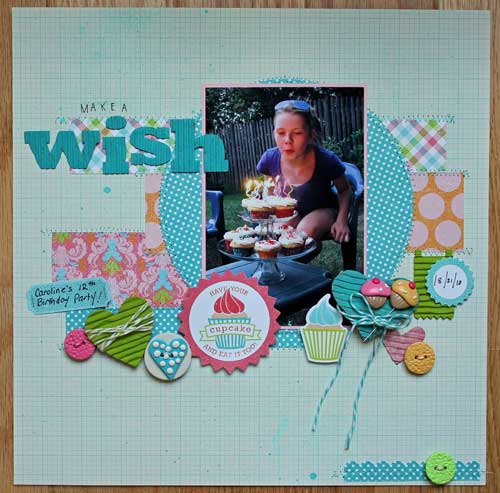
Make a Wish

Hi Everyone, I'm back with some really fun papers from My Mind's Eye... Hip Hooray Girl! My daughter has a summer birthday, so I figured these papers would be perfect for me to scrap with... of course I'm only scrapping last year's birthday, not that caught up! Well.. someday maybe!
I loved the cupcake theme since that's what we made instead of a big cake.
I added some fun corrugated shapes from Jillibean that I painted to match the colors of the Hip Hooray collection, some twine and of course, there are a few Whimsies from my stash.


I'll be back later this month with some more Hip Hooray! Enjoy the last weeks of summer!


Products Used:
Patterned Papers: My Mind's Eye Hip Hooray Girl Jubilant, Make a Wish, Happy Day; My Mind's Eye Lush 2 Turquoise Polka dot
Card stock Die Cuts: My Mind's Eye Hip Hooray Girl Accessories
Alphabets: Jillibean Soup Corrugated Kraft Alphas, Cosmo Cricket Tiny Type Handwritten
Die Cuts: Jillibean Soup Corrugated shapes Butterflies and Hearts
Twine: The Twinery Caribbean Teal, Honeydew Chartreuse, Mandarin Orange, Pink Sorbet
Buttons and Pins: My Little Bit of Whimsy
Paints: Adirondack Pool, Citrus, Shell Pink
Tattered Angels Glimmer Mist Turquoise Blue

Wednesday, July 27, 2011

Just Chillin'

Hi Everyone,
I'm back with my final layout using Fancy Pants Beach Babe Line. I've had so much fun with this great collection! The colors are so bright and cheery and are perfect for your summer and vacation layouts! This picture is from my family's trip the the Florida Keys last April. My daughter was so happy to just sit by the pool, relax, read and listen to her iPod!!

I misted some Maya Road zipper trim and spiraled it around on a Gluber to create my big flower.


I didn't have any alpha's I felt coordinated with my colors, so I painted some chipboard letters using an Adirondack Paint dauber. Paint daubers are a perfect way to customize chipboard!


That's it for today. I'll be back next week with a birthday layout using Hip Hooray paper from My Mind's Eye!


Products Used


Cardstock: Bazzill Kraft


Patterned Papers: Fancy Pants Beach Babe Cards, Fish Farm, High Tide, Sand Dollar, Tropical


Chipboard: Fancy Pants Beach Babe chipboard pieces


Flowers: Fancy Pants Beach Babe Paper Flowers


Buttons: Fancy Pants Beach Babe Buttons


Fancy Pants Beach Babe Journal Embellishments


Mist: Tattered Angels Glimmer Mist Party Pink


Paint: Adirondack Paint Dauber Aqua


Letters: Cosmo Cricket Tiny Type Handwriting, Fancy Pants Chipboard Alpha White

Maya Road Zipper Trim


MFT Dienamic: File Tab


DMC Floss

Wednesday, July 20, 2011

You are Here

Hi Everyone.. I'm back with some more Beach Babe from Fancy Pants. The colors in this line were perfect to highlight some of the pictures from our trip to the Florida Keys last April... all very tropical and cheery!!
One of the must-do photo stops for us was the Caroline Street sign. Not only is it one of the most famous streets in Key West, but it's also my daughter's name. We couldn't resist!


I had fun with the great embellies that come with the Beach Babe line... the rub-ons, flowers, buttons and cardstock die cuts are all fabulous... it was hard to choose!
I did a little hand stitching to make a "sun" and couldn't resist adding a Whimsy cloud.


A little Glimmer mist and some bling for the flip flops and the layout was complete! I'll be back next week with my final LO using Fancy Pants Beach Babe. Don't forget to check out all of the goodies at the LCOM store for your Summer layouts.


Products Used:


Patterned Papers: Fancy Pants Beach Babe Beach Bound, Cards, reef, strips, tropical, fish farm, high tide


Rub-ons: Fancy Pants Beach Babe Rub-ons


Chipboard: Fancy Pants Beach Babe Chipboard pieces


Die Cuts: Fancy Pants Beach Babe Design Elements Die Cut Pieces


Flowers: Fancy Pants Beach Babe Paper Flowers


Buttons: Fancy Pants Beach Babe Buttons, My Little Bit of Whimsy (Cloud)


Tattered Angels Glimmer Mist Party Pink


Cosmo Cricket Tiny Type: Handwriting

Wednesday, July 6, 2011

Sit Back, Relax.....

Happy July Everyone! I finally feel like summer is in full swing...beaches, boats and after a very snowy winter and rainy spring...SUN!!! Perfect for those great summer pictures and Fancy Pants' Beach Babe is the perfect paper line to scrap them with!


This is a picture of my daughter out fishing with my husband off of Cape Cod, MA. She's less into the fishing and more into the relaxing!

Beach Babe comes with so many fabulous embellishments! The sun here is from the great sheet of Beach Babe Rub-ons.


I cut these fish and the water from the Jumping Fish Paper and added some Stickles to them and some other pieces for shine and the water drops and sand dollar are from the coordinating chipboard pieces.


I used the leaves from the rub-on flowers to create sea weed and added some more chipboard fish, Stickles and glossy accent "bubbles."


Finally, I stitched some "waves" into the water to add to the floating effect.


That's all for now. I'll be back in a couple of weeks with some more Beach Babe. Make sure to stop by LCOM soon to scoop up some Fancy Pants Beach Babe and their other summer line Beach Bum Soon!
Products Used:
Patterned Papers: Fancy Pants Beach Babe Jumping Fish, Reef, Turtle bay
Rub Ons: Fancy Pants Beach Babe Rub-ons
Die Cuts: Fancy Pants Die Cut Pieces

Chipboard: Fancy Pants Chipboard pieces


Glossy Accents
MFT Die namic: Flat Bottomed clouds