Showing posts with label Twinery. Show all posts

Wednesday, May 16, 2012

Can't Touch This

Lily Bee Design use to be one of those manufactures that I would enjoy looking at, but could never get to work in my favor.  Well, not anymore.  Over the past two years something has changed about them, and I just love their designs, and their expanded lines of product.  I can't tell you how happy I was when I opened my pizza box a  few weeks ago to see the brand spanking new Double Dutch Collection staring back at me.  It is so pretty, even more so in real life.  (Not to mention the super cute way Tanya packages everything up with pretty pink tissue, it's like getting a birthday gift in the mail).  The line is bright but not too bright, with a touch of distressing to it.  Both sides are so great, I actually had a tough time deciding which one to use. 

I have three girls, all of whom dance competitively.  This photo is of my middle daughter Théa (pronounced T-eh-ah), and her friend after their last Hip Hop performance rehearsal before the big day (she's the one on the right).  Théa is  such a happy, smiley kid, that she actually has to work hard at keeping that 'serious, full of angst, hip-hop' face during the dance.  She's got it nailed here.
Click on the photo to enlarge
As you can tell I did some stitching on this layout (under the title, and on the banner).  It's one of my go-to techniques.  So often a layout just doesn't feel complete to me without a little stitching on it.
Here, I stitched the banner stickers directly to the photo.  I know many who struggle to sew or even write over top of their photos, not this girl.  The way I see it, a girl's gotta do what a girl's gotta do to achieve the looks she's after.  The only tricky part about stitching through stickers is that your needle will get a little sticky too.  A quick wipe with some Un-du, or any of those sticky removal products is all your needle will need to be good as new again.  If you don't have any of those, a baby wipe will also do the trick, it just requires a few more swipes than the others.
Here is a peek into my creative process. 
I began this layout wanting to weave the paper strips.  I cut a bunch of coordinating strips, and went to town.  In the end the design I ended up liking best, wanting the place the title on a curve, meant that I ended up covering most of the weave.  Oh well, no harm done, there's still a little poking out from behind the photo, and most importantly, I like the end result.  A girl's gotta do, what a girl's gotta do to achieve the look she's after right?!

You may not be able to tell, but there is actually a lot of layering going on here.  I really wanted the banner to have a 3-D look to it, which meant that I had to use some 3-D foam squares underneath the bulk of the photo/journal card cluster to achieve the right look.  

Here is a side view of the cluster.
See lots of depth and layering to get just the right look
There you have it.  A look at the more colorful side of the Lily Bee Design - Double Dutch Collection, as well as a peek into my creative process.  Hope you feel inspired to go and create something beautiful today.  If I've convinced you to give stitching on your photos a try for the first time, be sure to link us up, we'd love to come have a peek, and leave you some love.  But, before you go please take a sec to pop by the store you can see all the items I used on my layout here, and snag some for yourself while you're at it.

Have a great Wednesday everyone!


Wednesday, March 14, 2012

*{Sweet Right Here}*

Happy Wednesday everyone! I hope this Wednesday finds you well :)

I wanted to share some more of the Jillibean Soup Hearty Barley collection with you. This collection...just can't get over how fun it is to work with, how nice and thick the papers are and how fun the designs are!!

I created another layout with this collection and will be bringing you even more later on this month....so stay tuned for that.


Materials used:

The heart is accented with Jillibean Soup Corrugated Sheet -- the store is out of stock of brown....but is available in Rockin Red
October Afternoon Sprinklers in Brown Paper Bag
October Afternoon Sprinklers in Paper Doilies
Brown Ink
Sharpie Ultra Fine Point in Black


Have a great day!!!


Monday, March 12, 2012

Road Trip with Amy Tangerine!!

haha! No…I didn’t actually go on a road trip with Amy T….but wouldn’t that be so much fun???

Road trip 01

But…I DID document our recent road trip using YUMMY Amy Tangerine goodies from LCOM!!!

And let me tell you….this mini album from Amy T. is soooo  easy to play with! You can whip up a little album in literally minutes!!

I will share the first few pages I made, because the album is not completely done yet! I had so much fun over the March break that I didn’t get in a whole lot of scrapping time in!

I started with these goodies!

Road trip 04

Amy T. Diecut shapes

Amy T. Fabric sheet

Amy T. Off the Map mini album

Amy T. Pattern Paper

Assorted Thickers!

Assorted Twinery Twine!

I printed off my pics….most of them were instagram pics I had shared while on our road trip!

Here are the first few pages!!

Road trip 06

Road trip 08

Road trip 05

See how much fun these pages are?? I love the different shapes and colors, and sizes!! LOVE it all!

Here are the pages I have yet to finish!

Road trip 09

See…I have my pics there ready to add!

Road trip 03

Road trip 02

Keep checking my blog for the rest of the pages…to be posted this week!!

And go check out the LCOM store!! So many new goodies there!

Thanks for looking!!

Friday, February 10, 2012

*{Having it All}*

This layout was so fun to create. I cannot tell you how crazy fun it is to work with Simple Stories stuff, it's overwhelming at the possibilities that are available! (Overwhelmingly good though!!) I enjoy the thickness of the paper, but it's perfect for distressing too. The colors are beautiful, the fonts are fantastic, the feel the line gives out is warm and cheery -- yet if you need to say something striking and important you can and it won't get lost.

Make sure you check the store for great products and great customer service!!!


Have a wonderful Friday!!! Hope you can work some scrappy time in this weekend!! Whatever your plans, have a great one!! :)

Friday, December 23, 2011

Christmas Jammers

Merry Christmas to everyone today! We're actually celebrating Christmas day TODAY!

That's the life of a family with an nurse!! I'm actually working all day tomorrow and Christmas Day...so we decided to have our celebrations today! How fun!

And today you have the privilege of seeing my first LO in about 3-4 weeks! What's funny is that when I went to use my cutter last night....it was DUSTY!! Lol

I guess that's a hint that I need to use it more?? ;o)

Anyway, I created this LO last evening and I used Fancy Pants St Nick paper  Fancy Pants St Nick paper and the rubons too! I used some twinery twine too....and, of course, AC Thickers! All of these goodies can be found at the LCOM Shop!  


Here is my LO I made! Hope you enjoy it and I wish you and your family a very Merry Christmas and a joyful New Year!!

Wednesday, December 21, 2011

*Have a Holly Jolly Christmas*

Holiday Projects
by Nicole Nowosad

Since it is almost Christmas..... and you may have a few minutes on your hands... cause I am sure everyone is done all their shopping, baking, wrapping...etc... right? Well, if youdo have a few creative minutes this week, I thought I would share with you a bunch of holiday projects all made with the Holly Jolly line from Echo Park.

All of the projects can be made in 30 minutes or less and are a great way to use up some of your supplies too! I find that I am forever wanting new and more new seasonal lines - so this year I was determined to use up what I have - so next year, I can go crazy again!

So, here we go - first project up is a few quick gift card envelopes:

Really, all you need to do is take a 4" x 7" strip of Holly Jolly paper and make some quick folds! I stitched around the outside, but you could use some tacky tape, or another strong adhesive too to make the pockets. Embellish with some of the Holly Jolly Stickers or Chipboard shapes - even a journalling card and some bling ! Tie some Twinery baker's twine around the top and you are done!

Next up is a quick little gift jar for candy, etc.:

Take a mason jar, just add ribbon or twine; a sticker and the Maya Road Wood Snowflakes and some bling- fill with some yummy goodies and share !

Time for some quick decorations right? Here is a SUPER quick project that I am sure you have seen on the 'net:


I will be making more of these for next year! My kids even helped ;)
 Dust off those punches out and get to work! Punch a bunch of various shapes and papers - stitch together with your trusty sewing machine into a banner and hang! I added a few snowflake and xmas trees to mine too.
Add in a little glitter paper for sparkle too. Love the sparkle. ;)

One last project a little hanging project:


Just fold a few rosette/accordian circles and add a glitter snowflake and some chipboard letters.. hot glue to some tied ribbon and voila!

Hope you are inspired to make a few last minute projects this week as the countdown to Christmas has begun!!
*************************************************************************************
Supplies used:
Twinery - Baker's Twine
Maya Road - Wood Snowflakes

Now - go check out the store and all the deals - there are daily stocking stuffer deals going on right now!

Happy Holidays!

Tuesday, November 29, 2011

PAPER Trees!

Do you hand make paper crafts to place in your home for Christmas decorating?

I do…occasionally. And my girls are pretty crafty too! That’s why when they made these Christmas paper trees, I needed to take a picture and scrapbook this layout(I bet you thought I was going to share the trees, right? lol)

You can see in pictures on this page that they were quite excited about their finished product! Their trees are now in each of their rooms as part of their own room Christmas decor!

Papertrees LONovember2011

(photos taken on my iPhone…)

I used a BUNCH of LCOM supplies on this page!

All of the supplies listed can be found at the LCOM store!

I used:

~ Studio Calico Memoire paper

~ Amy Tangerine AC thickers!

~ October Afternoon sticker letters

~ Bakers twine from the Twinery

~ Cosmo Cricket Butterflies and Doillies

FUN!! 

Here are a couple of closeups of the deets!

Papertrees LO closeup01

Papertrees LO closeup02

I hope you’re all getting into the Christmas Spirit! It’s almost December 1st!!

And before I go…here’s a sneak of what I will be posting NEXT week! I bet you can guess what it is! (or maybe, you can’t??)

sneak peek Nov 2011

Have a HAPPY Tuesday!

signature

Wednesday, September 14, 2011

Cute as a Button

I can't believe summer vacation is over and we're already back into the routine of school, activities, homework, sleep, repeat! This week officially marks the start of our FULL schedule, and my job title officially changes to taxi driver and schedule coordinator! Luckily I did find time to scrap a little between lunches and laundry! I'm back with some more Echo Park Dots and Stripes. This time I mixed up both the Metropolitan and Candy Shoppe lines. I just love the colors and the simplicity of the patterns!

This is a picture of my daughter with one of our favorite little neighbors at the tea party held for all the girls in the neighborhood last month. It was so cute to see all the girls, big and little, dressed up and having fun together. They ranged in age from 13 down to 18 months! I kept the layout simple to let the picture be the focus.


I used the pennants from the Alpha Stickers Sheets along with some Twinery Twine to create a cute little banner.


I punched a heart from the Bubblegum paper and popped it up over a piece of the reverse side to give the layout a little dimension and show off the different patterns.


And the title was so simple to create... I combined the Alphas from both lines and added a Whimsy to complete it! It really was an easy and fun layout to create! I'll be back next week with my final Echo Park Dots and Stripes project...be sure to check in Friday to see what Nicole has created!


Supplies:
Patterned Papers: Echo Park Dots & Stripes Metropolitan Leaf Small Dot, Teal Small Dot; Echo Park Dots & Stripes Candy Shoppe Mango Small Dot, Bubblegum Small Dot
Stickers & Alphas: Echo Park Dots & Stripes Metropolitan Element Stickers, Alpha Stickers; Echo Park Dots & Stripes Candy Shoppe Alpha Stickers
Card Stock: Bazzill
Twine: The Twinery Blossom Light Pink, Caribbean Teal, Honeydew Chartreuse
Button: My Little Bit of Whimsy

Friday, September 2, 2011

Happiness is...

Hi Everyone... as promised, I'm back with some Echo Park Dots and Stripes Metropolitan! I LOVE the simplicity and colors of this line. I was inspired by some of the other Marketing Team members to think "outside of the page" this month, so I created a frame that my daughter could hang in her room featuring some of her favorite things (and people, and cats....)
The pictures are backed with the Metropolitan papers and are clipped to some Twinery Twine with little clothes pins I had in my stash.
I used some Maya Road Kraft Tags to label the pictures and canvas banner pennants are also from Maya Road and colored using mists.

And of course... there are Whimsies!!! It was a really fun project to put together and my daughter can't wait to hang it in her room! I'll be back later this month with some more projects using Echo Park's Dots and Stripes!


Supplies Used:
Papers: Echo Park Dots and Stripes Metropolitan Large Dot Navy, Concrete Small Dot, Ruby Red Small Dot, Teal Small Dot, Leaf Small Dot
The Twinery: Caribbean Teal, Honeydew Chartreuse, Stone
Maya Road: Kraft Mini Tags, Mini Pennant Banner Canvas
Canvas Corp: Frame memo Board, Clothespins (mini)
Alpha: Bella Blvd. Ciao Chip

Mists: Maya Road Lime Metallic, Shimmerz Spritz Seafoam
Buttons: My Little Bit of Whimsy

Wednesday, August 17, 2011

Birthday French Toast

Hi Everyone, I'm back with some more My Mind's Eye Hip Hooray -Girl. This has been such a fun line to work with... the colors are so bright and cheery! They coordinated perfectly with this picture of my daughter enjoying the Cinnamon Swirl French Toast I made for her birthday breakfast last year!
I had fun with clustering embellies again... it's a new favorite thing of mine...I painted some Jillibean corrugated shapes and also created a flower using a Gluber and some Maya Road pleated ribbon. I just fell in love with that owl!


I also spritzed the background paper with some Glimmer Mist for texture. A few buttons and some twine from the Twinery and voila!


I'll be back at the very end of the month with one more project using Hip Hooray. In the meantime, make sure to stop by the store at LCOM... new goodies are coming in every day from CHA!!


Supplies used:
Card stock: Core'dinations Tim Holtz Pool
PPs: My Mind's Eye Hip Hooray-Girl Confetti, Happy Day, Party Time, Accessory Sheet; Scenic Route Graph paper
Chipboard: Jillibean Corrugated Shapes Hearts, Bazzill Chips Garden Flowers
Fibers: Maya Road Pleated Ribbon; The Twinery Blossom Light Pink, Caribbean Teal, Honeydew Chartreuse
Paints: Adirondack Pearl Metallic, Hazelnut, Shell Pink, Citrus; Jenni Bowlin for Ranger Chicken Feed, Malted Milk, Brown Sugar, Cough Syrup
Buttons and Pins: My Little Bit of Whimsy
Tattered Angels Glimmer Mist Turquoise; Maya Mist Lime Metallic
Tiny Type Handwriting
Gluber

Wednesday, August 3, 2011

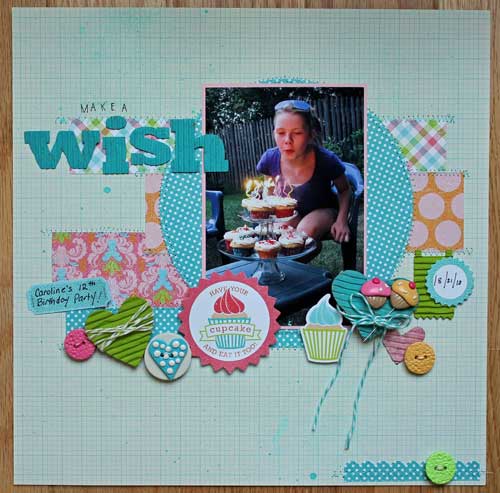
Make a Wish

Hi Everyone, I'm back with some really fun papers from My Mind's Eye... Hip Hooray Girl! My daughter has a summer birthday, so I figured these papers would be perfect for me to scrap with... of course I'm only scrapping last year's birthday, not that caught up! Well.. someday maybe!
I loved the cupcake theme since that's what we made instead of a big cake.
I added some fun corrugated shapes from Jillibean that I painted to match the colors of the Hip Hooray collection, some twine and of course, there are a few Whimsies from my stash.


I'll be back later this month with some more Hip Hooray! Enjoy the last weeks of summer!


Products Used:
Patterned Papers: My Mind's Eye Hip Hooray Girl Jubilant, Make a Wish, Happy Day; My Mind's Eye Lush 2 Turquoise Polka dot
Card stock Die Cuts: My Mind's Eye Hip Hooray Girl Accessories
Alphabets: Jillibean Soup Corrugated Kraft Alphas, Cosmo Cricket Tiny Type Handwritten
Die Cuts: Jillibean Soup Corrugated shapes Butterflies and Hearts
Twine: The Twinery Caribbean Teal, Honeydew Chartreuse, Mandarin Orange, Pink Sorbet
Buttons and Pins: My Little Bit of Whimsy
Paints: Adirondack Pool, Citrus, Shell Pink
Tattered Angels Glimmer Mist Turquoise Blue

Wednesday, July 13, 2011

You amaze me

You amaze me
by Nicole Nowosad

Supplies used:
Pink Paislee Daily Junque Ephemra
Pink Paislee Mini notes & labels

********************************************************************
I had tons of fun this month playing with Pink Paislee's Daily Junque collection! Seriously, there are oodles of goodness in the line!

The papers are a unique blend of funky hip modern with a twist of vintage mixed in. Just check out the bird and quote on this paper:

 I added a bit of Bazzill Tulle to the Prima flowers for some softness
 The Twinery twine adds a simple touch to the photo.. and it is such a good deal!!! Steal some up quickly!!!
I just love the 2 fonts that you get on the Bella Blvd. alpha sticker sheets.. and 2 different colors too!

Make sure you visit us soon for more amazing creations from the Let's Capture Our Memories Marketing Team... and don't forget to stop by the store to see what's new and what's coming!