Showing posts with label Pink Paislee. Show all posts

Thursday, August 28, 2014

Product Shuffle : 5x7 Kraft Envelopes Take 2

Good morning!
This week I continue my quest to use up part of my massive stash of envelopes!  If you want to my first fist take click here.
It seemed like it had been so long since we were invited to a wedding.  All of sudden, a couple of months ago we received three invitations!  We unfortunately missed two while we were away overseas on our vacation, but I still wanted to send cards.  The third wedding is this weekend.  While making wedding cards, I will be using envelopes to seal the cards, obviously!  But how could I use more?  By making a card using the envelope!
I am using a kraft envelope, that way it is sturdy enough to be used as a card.  it is already scored, so all I need to do to transform it into a card is to cut the sides.  I removed about one inch on each side to make a 5X6 fold over card

I then added Pink Paislee's Secret Crush paper to the card.  This romantic love themed collection seemed perfect for a wedding card.  

 I like how it all came together.  You would never guess that the card was created using an envelope.
I used Pink Paislee mini alpha stickers, Webster's Pages trim and Prima flowers and flourishes.  Super easy!  I even embellished the inside using fussy cut doilies from the same paper collection
I did this to hide the glue strip that was on the envelope, but it makes it just that bit more fancy.  I hope you like it! I'm off to make more of these envelope cards.  See you Saturday for our weekly sketch reveal!
Have a great day!


Thursday, August 14, 2014

Product Shuffle : 3D foam squares

Good morning!

Jocelyne, here, and welcome to another installment of Product Shuffle, where I try to show you a different way to use some of our scrapbooking supplies.  This week we are going to take something that is always hidden and bring it to the front of our page.  That's right!  We are going to showcase some 3D foam squares!


How are we going to make the foam square pretty and not so sticky?  Easy!  Simply by taking one side of the already sticky side and dipping it in glitter!  Since the 3D foam square is like a double sided sticker, I simply left one side of the protective backing on one side, took the other side out and dipped it in my glitter.  I used my finger to brush the excess glitter while making sure it was not sticky anymore.  I then added small My Mind's Eye alpha stickers on top for my title.  Do you see it? 


I wanted lots of sparkle to the rest of the layout, so I used the very pretty American crafts gold letters thickers, a strip of Fancy Pants metallic paper that I passed through a scallop border punch, and some My Mind's Eye enamel shapes.


Those glittery hearts are so pretty!


The butterflies, frames and chevron cutouts are from Pink Paislee's cottage farm collection.  They went perfectly with the My Mind's Eye Now and Then and Ashbury Heights and Echo Park's Capture Life paper I used.  I also used some Bo Bunny, Prima and Kaisercrafts flowers, Basic Grey enamel dots, CMTH cardstock and Webster's Pages ribbon.

Here is my finished layout!


So there you have it!  I hope my new twist on 3D foam squares inspires you.  Don't forget to tune in right here next Saturday for even more inspiration when we unveil another sketch.  I can't wait to see what our talented designers have created!

Have an amazing day!

Monday, April 21, 2014

Inspiration Station

Our family is entirely composed of book worms.  We all read, we all love it.  We have books all over the place.  I had a picture of one of the older kids in my daycare reading to the younger ones and wanted to scrap it for a while.  I needed inspiration and I found it with this quote. Why not find inspiration for a reading layout from a book? Plus, this quote is so true!  How we love to get lost in our books.  I love the primary colors featured in the picture as well.


I immediately though of Pink Paislee's Hey Kid collection .  The new Kre8v kit is simply amazing.  You get so much stuff!  Paper, transparent border stickers, cardstock stickers, alpha stickers!  The colors were perfect too! 


Here is the final product.  I actually used the saying as the title using the alpha stickers included in the kits, with some other alpha stickers from Basic Grey.  I also used some canvas stickers and chipboard stickers from Pink Paislee Hey Kid collection.  To make the picture and pattern paper pop, I matted everything with CTMH red cardstock.  To add dimension to the title I added American Crafts thickers to the key words. 


I love how it all came together!


There are great quotes in children's books.  What are your favorites? 

Saturday, November 24, 2012

Oldies and Goodies


Hi, Erin here today to talk a little more about using old products and new products. Last week we looked mainly at combining papers and embellishments in a mix match fashion. This week, I want to show you how to use up some older stuff, and make it new using fun new products.

I chose to dig through my rarely used chipboard, and pull out some pieces from Fancy Pants Designs. You may even have something similar in your collection.


Chipboard is one of those staple products that can always be altered to look updated and modern. Even printed pieces of chipboard can be given a new look by either peeling off the printed layer, or by recovering the print with paper or paint. In this case, I'm giving the surface of the raw chipboard new life with one of my favorite new trends; washi tape.

Any colour combo goes, you could even repeat the same pattern over and over again.  Just line each strip up side by side, and go right to the edge. You can trim off any tape that goes over.

The next step is to take your craft knife and cut out any pieces you wish to use. I chose to remove the small inner frame and shaped tags, but to leave the smaller shapes in the bottom, so it created a polaroid type frame. Cutting is very easy, as the tape is thin, and you can see the indent of the lines where you should cut.

I dug through my pile of old Christmas papers to find a paper that worked with the patterns of washi tape I used. Wouldn't you know I had a red and white polka dot that matched exactly! ( October Afternoon).
Add to that a smattering of old and new embellishments, and you've got a page that can comfortably fit in your album with this year's pages.

New embellishments used: 
Wooden Shapes : Studio Calico ( covered with Tim Holtz Platinum Distress Stain)
Alterable Chipboard Stars: Pink Paislee (Coloured with Distress Stains)
Snowflake Die Cuts: Maya Road


Friday, November 23, 2012

You & Me

Happy Friday friends,

Have you seen the new Pink Paislee Portfolio Collection?  I just love it.  yellow, cream, and grey seem to be very big right now in the industry, and Pink Paislee mixes them perfectly in this new line.  I had this photo of my little buddy Nyah and I kicking around since summer.  I love this photo of the two of us.  She is one great kid!  I knew I wanted to create a great layout with this sweet photo of us.  With this collection, and the help of my Silhouette Cameo, I think I did pretty good.


You can see the Portfolio papers in the shop here.  I added some old Echo Park brads, and some mist from my stash to this layout as well as some flair from a fun new shop I discovered on Etsy.  I hid the journaling on the tag with the pull out ribbon under the banner flair badge.  It reads "I couldn't love this girl anymore if she were my own.  I remember praying for her while she was still in China.  She's been here 4 yrs now, and she blesses us all."

I hope you have a great weekend in store.  I'll be back next Friday with my very last post as a member of the Marketing Team. 

Sherri

Monday, October 29, 2012

Nicole's last post

It's my last post today on the blog and my last page with the mystery box, which had some MME, Pink Paislee, Simple Stories, Studio Calico and Maya Road in it. 

Here is my page with all the lines mixed up:

 I added a little banner with some punched circlesm twine, clothes pins and letters from my stash.
I cut a pocket page from Simple Stories down for one of the background papers. I tore it up a bit and layered some paper behind it :
Supplies:
Pink Paislee Indigo Bleu papers
Studio Calico Heyday papers
My Minds' Eye paper
Simple Stories pocket memorabilia page

Thanks for listening to me ramble and comment on my pages these last couple of years !

Please visit me on my blog at www.justnicks.blogspot.com

Saturday, May 26, 2012

Rockin' The Hill

Happy Saturday friends!

It's Sherri here with my last post for this month.  As you may remember I've been working with Pink Paislee's Prairie Hill collection. It has been one of my favorite collections to work with from the last CHA releases.  I've always loved the bright bold look of Pink Paislee, despite the fact that I would struggle to make it look great on my own layouts.  This collection, was a different experience for me, however.  I love all the yellows & blues and the slight rustic feel of the papers. As soon as I saw it, I was sold.  It didn't take much for me to burn through the papers, buttons, and chipboard pops.

I have only bits of the line left to work with, but managed to put together a little something for you today.  I decided to go with a pretty simple layered design.  I knew that I wanted to try and use up all my remaining chipboard pops and buttons, so I designed the layout around them.
After putting everything together I felt like something was still missing, so I used my Martha Stewart butterfly punch and layered a couple of butterflies with an Echo Park This & That brad in the center and called it a day.  I like that the simple design keeps the focus on the sweet photo of my friends.  I've made it easy for you to find the supplies I've used in the store by hyper linking them.  The extras from my stash are the American Crafts alphabets, an old Jillibean Soup journaling spot, and my Martha Stewart butterfly punch.


I hope today offers you a little time to be creative.  I know there is a lot of inspiration to be had over at the LCOM forum.  You can join in the fun here.  If you are more in a shopping kind of mood today, I highly suggest you head over to the LCOM store and check out all the new product that has recently been added.  Amy Tangerine, Crate Paper, and Studio Calico just to name a few. 

Hope your weekend is turning out to be a great one!


Monday, May 7, 2012

Chevrons & A Pinwheel

Doesn't this paper just scream to be cut up into individual chevron strips? 
 At least that's what I thought when I saw it.  So here's what I did about it.
Armed with a good pair of scissors, and sewing machine close by I got to work making my own patterned paper background. I added a little more depth to the chevron pieces by folding up both the top and bottom of each piece.  Once I had my background complete, I mounted my photo on a couple of pieces of off centred coordinating  sheets of the Prairie Hill papers, place the stack on my page, and could have called it a day.  Me, being me, however, loving clusters on my layouts, and having all of these wonderful coordinating embellishments left over, I just had to add some more to the page. 
Even after adding the button, chipboard pops and alphabet stickers for journaling, I really felt the layout was still missing something.  
 Enter the pinwheel.  I took one of the papers in the collection and made my own embellishment to add.  Thereby completing the layout to my satisfaction.
Here is the result. 
The photo matches the papers perfectly, and there is so much depth and texture to the layout, it makes me happy.  The photo was taken with my phone while on an impromptu coffee date with my niece.  I love that the iPhone means I always have a camera with me ready to capture the everyday little things of my life.  This girl is one sweet kid.  She was in the city (she lives just outside of Winnipeg) for a convention, and called me when she was done to see if we could have a quick coffee and catch up.  I consider it a real blessing that my 16 year old niece would choose to spend time with me, when she could have been doing any number of things with her time in 'the big city'.

This Pink Paislee collection has been so fun to work with.  Both the Prairie Hill, and Indigo Blue Collections are still available in the store, and both have really fun coordinating embellishments and alphas.  You can see it all, and grab some for yourself here

 Products Used:
Pink Paislee
Other:
Tim Holtz: tonic scissors, Studio Calico, and Sassafras Lass alphas, brad

Wednesday, April 18, 2012

For the love of Prairie Hill

Have you noticed the New Pink Paislee Collections in the store?  They totally caught my eye, and I think they look even better in real life.  As soon as I saw the Hilltop sheet from the Prairie Hill Collection, I knew I wanted to cut it into itty bitty pieces. 
I had a feeling I would  love it even more with a little cardstock showing through.  I used my paper trimmer to get nice straight lines, placed them evenly on the cardstock,then glued them down one by one.  Isn't that kite the cutest?

This is the design I ended up with. 
I apologize that the little stickers are difficult to read.  They say "They make life even sweeter" The white ink text reads: "There are sure to be a lot of laughs when our families are together"


I left the layout like this for several days, despite felling like something was missing. Then a couple of weeks later while showing it to a friend I realized what was missing.  I had the idea to add a few strips of jounaling to the top right of the layout.  So I pulled out some Cosmo Cricket Tiny Type, and added sentiments that were fun, matched the colours, and were appropriate for the photo of the family I was featuring on the layout.
Here's a close up of the Tiny Text stickers.
Here is the layout that is in my album today.  I feel as though the little journal strips finish it off much better, and add a little more character to a page that's all about a family that's full of character.

Products  used:
Bitty Block Alphas: yellow, blue,
Jenni Bowlin butterfly punch,
Cosmo Cricket Tiny Text
Uni Ball white pen
American Crafts thickers
May Arts Jute
Jenni Bowlin tab punch

If by chance, this collection doesn't have you jumping up and down, I've got to let you know that there has been a ton of new product added to the store over the past couple of days.  Some of which include, Smash, Crate, Amy Tangerine and much more.  I would strongly encourage you to head on over and have a peek before it's all picked over.

Have a great Wednesday everyone!

Wednesday, April 11, 2012

Let's talk versatility

So, this month, I though I would take a different angle at my assignments. I browsed through the LCOM store and there was SO much I wanted to get - and sadly, I couldn't!!! But, there were ways for me to get some of the things I really wanted and not break my budget either!

The main thing I got was a couple paper pads - nope, not 12x12 - 6x6. Really, the main difference is that the patterns are smaller in size - but really - I don't think it makes a difference!

Here is a page I created using just a 6x6 paper pad + 1 other 12x12 sheet for a base for the layout:


You can tell that the patterns are smaller -but I think it fits! Check out closer up and see.
 The patterns on the papers work just as good smaller as larger!! If you didn't know... I bet you wouldn't even know it was made with a smaller sized paper!

 and i just have to say that these are my new favorite letters from American Crafts:
*** and they come in a bunch of different colours too ***

I chose a couple lines by My Mind's Eye from the store to work with - but there are 6x6 paper pads by all these manufacturers in the store right now:


other supplies:

I have another project to share with you this week using the smaller size- come back and check it out! :)
Of course, make sure you check out what is NEW at LCOM this month!

Friday, January 13, 2012

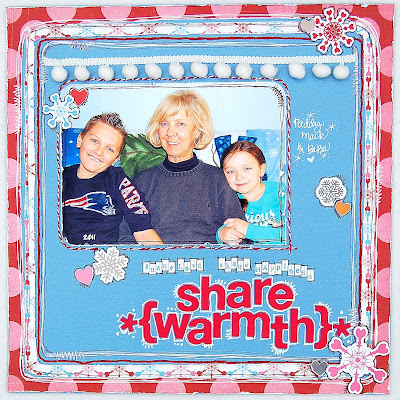
*{Share the Love Friday}*

Hey Scrappy Friends...I hope this Friday finds you well! :)

I wanted to share with you my latest creation using some of the great products available in the LCOM Store. :)

My Mom visited over the holidays and I captured this great photo of her and the kids. Pink Paislee was the perfect collection to use with it, the colors and the feel of the papers make you feel warm and cozy, yet wintery at the same time. I *heart* them!! :)
The paper and my Momma and kiddos!


Materials used:

American Crafts Thickers
Bazzill Basics Pom Pom in White
Red Embroidery Floss


Hope you have a great Friday!!! Here's hoping you get some time to fit some scrapping in too!!!


Monday, October 31, 2011

More than just a Mom

More than just a Mom
by Nicole Nowosad
Supplies used from the LCOM store:
Crafter's Workshop Stencil - Grid Mesh
Tattered Angels Mist - Suede, Patina
*****************************************************************************
I just wanted to share this quick page I made with some misting masks and stencils available in the shop right now!

I started off with the Crafter's Workshop stencil and lightly spritzed the page.. once dry I added a second misted layer with the Pink Paislee mask.  I wanted to use gesso with the Pink Paislee mask, but *sigh* I don't have any.. so I used some white paint and then once it dried, I spritzed some glimmer mist over it to have it show up more!

To finish off the page I added a few scraps of paper, punched out some shapes and added it around the edge of the cardstock.. the October Afternoon alphas are fun and in such great colours .. I love the multi colour look on the title!

Here are a few fun masks in the store that would be great with your mists from Prima:


Have you created a page or card with one of the masks in the LCOM store? Share it with us in the gallery, forum or on our Facebook page!

Friday, October 21, 2011

Cards

Cards
by Nicole Nowosad
Supplies used from the LCOM store:
Pink Paislee Mistables - Scallop Canvas Trim
Tattered Angels Glimmer Glaze - Oil Slick
***********************************************************************************

It's that time of the month again.. where I show you a few simple cards made with the products I received from LCOM!!


I really kept it pretty simple with the mistables this time. I used a little red ink around the outer edge of the paper on this card, and attached another flower from the trim.  I added some of the Bazzill Tulle that I picked up a few months ago - used it like a ribbon and tied off a bow, and topped it off with the homemade canvas flower!

 I used the Pink Paislee Mistable Mask to create the background for the sentiment on the second card.
I actually misted the ruffle trim with mist and added some buttons and a flower on top too. A few little pearls on the misted pattern adds a lovely touch!

 The masked pattern goes well with the misted mistable paper.. the bottom was rubbed with olive ink and misted with a little suede glimmer mist too!

Have you enjoyed all the Marketing Team projects so far this month....?

Check back on Monday - we have more in store for you!

Thursday, October 13, 2011

Frame Set continued

Frame set continued
by Nicole Nowosad
Supplies used from the LCOM store:
Pink Paislee Mistables - Scallop Canvas Trim
Tattered Angels Glimmer Glaze - Oil Slick
Tattered Angels Glimmer Mist - Suede, Indian Corn, Tattered Leather, Patina, Olive, Electric Blue
**************************************************************************
Hi again! I am going to share with you the last few frames from my frame set project I shared with you the other day using Pink Paislee Mistables!

Along with the "home" frame, I made a frame for each of my three kidlets for the four frame grouping.

I wanted to use a different pattern from the collection pack for each frame, and different colours too.
 The home frame was the one that tied all the different colours and patterns together - remember that heart I made? It had all the different patterns on it that I used in each of these frames, in each of the colours to draw the project together.

Anyways.. here are the the kids!

For this first page, I spritzed some Electric Blue mist on the centre of the page, and then rubbed Oil Slick around the edges to create a darker look.
 I added a Crate Paper button, that I distressed with some Staz On Ink.. I punched out some stars in a different Mistable paper and misted it with Indian Corn (that red is my fave!)


This page was misted with Olive Green mist and a little glimmer glaze added to the very edge.
I rubbed it in good to blend lightly.
I lifted the idea of sewing the buttons into the pattern from the Pink Paislee team.. it is a great look! 
A few stamped stars finishes this one off. Love the yellow stars done with ink just near the edges of the star shapes.
 This last page was all done with that gorgeous Indian Corn colour. It is darker around the edges from more and more mist.. and really light throughout the middle of the page.
  
 I used the scallop edged trim to make the canvas flowers by sewing the thread through a gathering it in the center.. top it off with a pretty button and you are good to go! I really love the natural colour of the canvas trims and flowers..just because it is mistable.. doesn't mean you have to :)


I hope you have enjoyed this project as much as I have presenting it to you. I hope you will try something like this in your home and share it with us on the forum and gallery!

Check out what the rest of the marketing team is up to daily here on the blog! Check back often to be inspired!